Using Formulas in Microsoft Excel
This is the math lesson, and whether you love or hate math, by the end of this lesson you will agree that Excel makes math easy. We will start by explaining some of the basic concepts you need to understand regarding how Excel does math and then will get into entering formulas.
Lesson Goals
- Learn about math operators and the order of operations.
- Learn how to enter basic formulas.
- Use AutoSum to sum data with one click.
- Learn about absolute, relative, and mixed cell references.
- Copy formulas and functions.
Math Operators and the Order of Operations
Math Operators
The six mathematical operators you need to know to enter basic formulas in Excel are:
- Addition. Plus sign (+).
- Subtraction. Minus sign (-).
- Multiplication. Asterisk (*).
- Division. Forward slash (/).
- Percent. Percent sign (%).
- Exponentiation. Exponents sign (^).
Math Operators
When a formula uses more than one operator, the order of operations in Excel is as follows:
- Parentheses. Operations contained in parentheses (or brackets) are executed first.
- Exponents. Exponents are executed second.
- Multiplication / Division. Multiplication and division, which Excel treats equally, are executed third, from left to right.
- Addition / Subtraction. Addition and subtraction, which Excel treats equally, are executed last, from left to right.
Entering Formulas
The simplest (not always the easiest) way to enter a formula in Excel is to:
- Select the cell in which you wish to enter a formula.
- Press "=" on your keyboard.
- Select the first cell which contains data you will use in your formula.
- Type the operator (+, -, *, or /).
- Select the second cell which contains data you will use in your formula.
- If necessary, type additional operators and select additional cells. If some operations should be performed before others, enclose those operations in parentheses.
AutoSum (and Other Common Auto-Formulas)
Some formulas can be entered simply by clicking a button in Excel. Excel will even guess which data the formula applies to, meaning that if your spreadsheet is properly laid out, you don't have to select the cells.
AutoSum
To quickly sum a row or column of data:
- Select the cell to the right or at the bottom of a set of numbers:

- On the HOME tab, in the Editing group, click the AutoSum command:

- Note that Excel guesses the data you wish to sum and gives you the option to edit the formula if you wish:

- Press Enter.
Count Numbers
To quickly count the number of cells in a row or column that have data:
- Select the cell to the right or at the bottom of a set of numbers:
- On the HOME tab, in the Editing group, click the drop-down arrow to the right of the AutoSum command:

- Select Count Numbers:

- Note that Excel guesses the cells in which you wish to count numbers and gives you the option to edit the formula if you wish:

- Press Enter.
Average
To quickly average the numbers in a row or column:
- Select the cell to the right or at the bottom of a set of numbers:
- On the HOME tab, in the Editing group, click the drop-down arrow to the right of the AutoSum command:
- Select Average:

- Note that Excel guesses the cells in which the data you wish to average lies and gives you the option to edit the formula if you wish:

- Press Enter.
Min
To quickly find the minimum number in a row or column:
- Select the cell to the right or at the bottom of a set of numbers:
- On the HOME tab, in the Editing group, click the drop-down arrow to the right of the AutoSum command:
- Select Min:

- Note that Excel guesses the cells in which you wish to find the minimum number and gives you the option to edit the formula if you wish:

- Press Enter.
Max
To quickly find the maximum number in a row or column:
- Select the cell to the right or at the bottom of a set of numbers:
- On the HOME tab, in the Editing group, click the drop-down arrow to the right of the AutoSum command:
- Select Max:

- Note that Excel guesses the cells in which you wish to find the maximum number and gives you the option to edit the formula if you wish:

- Press Enter.
Copying Formulas and Functions
Formulas can be copied from one cell to other cells in Excel. To copy formulas in Excel:
- Select the cell which contains the formula you wish to copy.
- On the HOME tab, in the Clipboard group, click the Copy command.

- Select the cell into which you wish to copy the formula.
- On the HOME tab, in the Clipboard group, click the Paste command.

Another way to copy formulas is by using Autofill, or dragging the Fill Handle in the cell containing the formula to the other cell or cells in which you wish to copy the formula. Autofill, which was introduced earlier in this course, is especially useful for copying formulas.
To use Autofill to copy formulas:
- Enter a formula in one cell:

- Click on the Fill Handle, which is located in the bottom right cell of the selected cells:

- Drag the Fill Handle for as many rows or columns as desired:

- Release the mouse to enter the formula into the desired cells:

Displaying Formulas
When working with formulas, if you wish to display the formula within its associated cell in a worksheet, in Excel 2013, select the FORMULA tab and in the Formula Auditing group, select Show Formulas.
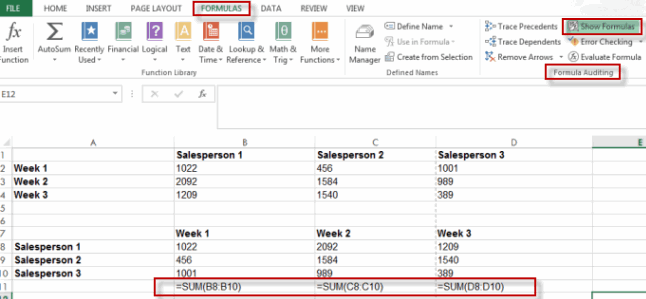
You can toggle this option on and off by selecting and de-selecting this option.
Relative, Absolute, and Mixed Cell References
Relative Cell References
Note that in the example above, when we copied the formula from one cell to others, the formula automatically changed to add the cells in the corresponding rows:
- The formula in cell E4 added B4, C4 and D4.
- The formula in E5 added B5, C5 and D5.
- etc...
This happened because the formula we entered contained Relative cell references.
Relative cell references are the default in Excel. They are called "relative" because the actual cell row and column used in the formula are not significant. Instead, the significant thing is the location of the cell used in the formula relative to the location of the cell in which the formula is entered.
The way to think of the formula E4 = B4 + C4 + D4 is Result = (cell 3 places to the left) + (cell 2 places to the left) + (cell 1 place to the left) of the cell in which the Result is entered.
Absolute Cell References
Sometimes you want a formula to refer to a specific cell regardless of where in your worksheet the formula is executed. In the following example, the formulas in column F all refer to cell B1: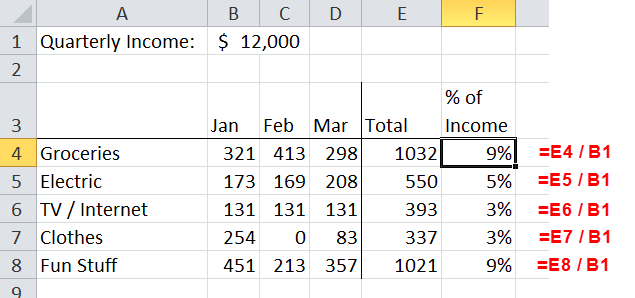
The way to tell Excel that a formula should always refer to a specific cell is to use dollar signs ($). In the above example, the formula we used in cell F4 is =E4 / $B$1. No matter where we put this formula in our worksheet, it will divide the cell one to the left of the cell in which we enter the formula by cell B1.
Finally, notice that we entered the dollar sign twice in the above formula, before the "B" and before the "1". The first $ made the column an absolute reference and the second made the row an absolute reference. In this example, it was not actually necessary to make the column an absolute reference. The takeaway here is that when you refer to a cell in a formula, you can make either or both of the column and row references Absolute or Relative.
Mixed Cell References
Mixed cell references are a combination of relative and absolute references.
Just like in absolute cell references, in mixed cell references the dollar sign ($) is used to refer to a specific cell that is fixed.
An example of a mixed cell reference would be: $F4. This would mean that the the column letter, F, is fixed, while the row number is allowed to be copied from cell to cell.
Working with Formulas
Duration: 15 to 25 minutes.
In this exercise, you will use formulas to enter additional data into the quarterly profit and loss statement we are creating for Dave's Lemonade Stand.
- Continue working in the workbook from the last exercise or open Dave's Lemonade Stand - Working with Formulas.xlsx from your Webucator/Excel2013/Exercises folder.
- Use AutoSum to sum the Total Income in row 5.
- Enter a formula to make payroll 30% of Total Income each quarter.
- Enter a formula to make marketing 25% of the each quarter's Total Income.
- Enter a formula to make Supplies 20% of Total Income each quarter.
- Use AutoSum to sum the Total Expense in row 10.
- Use a formula to calculate Net Income (Total Income - Total Expense).
- Enter "Margin" in cell A12 and then use a formula to calculate the Margin (Net Income / Total Income).
- Format all cells to look like they do in the below image:

- Save the workbook.
Solution:
- Open or go to the specified file.
- Use AutoSum to sum the Total Income in row 5.
- Select cell B5 and click AutoSum and press Enter.
- Grab the Fill Handle in cell B5 and drag the formula in cell B5 to cell E5.
- Enter a formula to make payroll 30% of Total Income each quarter.
- In cell B7, enter "=B5*.3"
- Grab the Fill Handle in cell B5 and drag the formula in cell B7 to cell E7.
- Enter a formula to make marketing 25% of the first quarter's Total Income each quarter (so all formulas refer to cell B5).
- In cell B8, enter "=$B$5*.25".
- Grab the Fill Handle in cell B8 and drag the formula in cell B8 to cell E8.
- Enter a formula to make Supplies 20% of Total Income each quarter.
- In cell B9, enter "=B5*.2".
- Grab the Fill Handle in cell B9 and drag the formula in cell B9 to cell E9.
- Use AutoSum to sum the Total Expense in row 10.
- Select cell B10 and click AutoSum and press Enter.
- Grab the Fill Handle in cell B10 and drag the formula in cell B10 to cell E10.
- Use a formula to calculate Net Income (Total Income - Total Expense).
- Select cell B11 and enter "=B5-B10".
- Grab the Fill Handle in cell B11 and drag the formula in cell B11 to cell E11.
- Enter "Margin" in cell A12 and then use a formula to calculate the Margin (Net Income / Total Income), which should be displayed as a percent.
- Enter "Margin" in cell A12.
- In cell B12 enter "=B11/B5".
- Grab the Fill Handle in cell B12 and drag the formula in cell B12 to cell E12.
- Select cells B12:E12 and click the Percent command.
- Make any necessary formatting changes.
- Save the workbook.