Entering Data in Microsoft Excel Worksheets
In this lesson, you will learn about entering data.
Lesson Goals
- Enter text in Microsoft Excel worksheets.
- Add or delete cells in worksheets.
- Add an outline for your data.
- Enter a hyperlink in a worksheet.
- Use AutoComplete.
- Enter numbers and dates in Microsoft Excel worksheets.
- Use the Fill Handle to add data to cells.
Microsoft Excel worksheets are made up of rows and columns. Rows are defined by numbers and columns are defined by letters. When you open Excel, cell A1 is automatically highlighted. Anything you type will show up in this cell. To enter text into a different cell, simply select the cell by clicking on it and then begin typing.
Before entering text, it is helpful to be aware of the three shapes your cursor will take and what each one means:
- The thick white cross. This is used for cell selection.

- The thin black cross. This is used for autofilling data and for copying formulas, both of which will be covered later in this course.

- The four-headed arrow. This is used for moving cells or other items.

Entering Text
To enter text in Microsoft Excel:
- Select the cell into which you wish to enter text by clicking on it.
- Begin typing.
Note that in addition to showing up in the cell, the text you are typing also shows up in the Formula Bar:
If you are entering a lot of text, it is sometimes easier to type directly into the formula bar. To do this, simply select the cell by clicking on it and then click in the Formula Bar and begin typing.
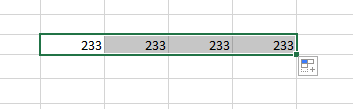
Expand Data across Columns
You can also easily expand data across columns by hovering the cursor over the lower-right corner of the cell and when it turns into a thin black cross, dragging. This will copy the data to multiple columns.
Adding and Deleting Cells
You can add and delete cells when working with a worksheet:
To add a cell to a worksheet:
- Select the cell where you want to insert a new cell.
- Right-click and select Insert.
- In the Insert dialog box, select an option and click OK.
To delete a cell in a worksheet:
- Select the cell you want to delete.
- Right-click and select Delete.
- In the Delete dialog box, select an option and click OK.
Adding an Outline
You can group your data in Excel by using outlines. An outline allows you to group and limit that data that you are viewing You have two types - Auto and Manual. Auto Outline works well if you have used Summaries (formulas to tally rows). Manual works well if you just have a list and you wish to choose the groups.
To add an outline to your data:
- On the DATA tab, from the Outline group, select the Group drop-down arrow.
- Select Auto Outline.
- You can now expand or collapse sections using the + and - signs on the side of the worksheet.
Using AutoComplete
When you are typing data into a list, Microsoft Excel will attempt to guess what you intend to type based on the data in the cells above the one in which you are typing. The example below illustrates this. Only the letter "B" has been typed into cell A4. Excel is guessing that the user intends to type "Ball":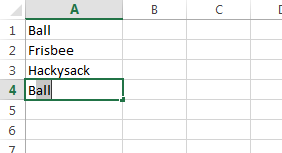
If the user does intend to enter "Ball", he or she can press Enter as soon as Excel has correctly guessed.
Things to be aware or regarding the AutoComplete feature:
- If there are multiple words in a list starting with the same letter, Excel won't guess until enough letters have been typed that only one match remains:
- If there is an empty cell in the middle of a list, Excel will assume the data above and below the empty cell constitute different lists, and AutoComplete will not recognize words from the other list:
Entering Text and Using AutoComplete
Duration: 5 to 10 minutes.
Before the end of this course we will build a spreadsheet showing the quarterly profit & loss statement for a fictitious company called Dave's Lemonade Stand. This is the first of these exercises. The spreadsheet will ultimately look like the below: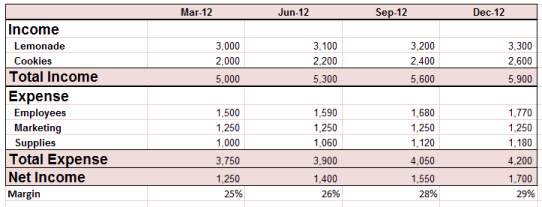
In this exercise, you will enter income and expense categories in column A of a new worksheet.
- Open a new workbook and enter text, using AutoComplete whenever possible, in column A so that your worksheet looks like the following:
- Save the workbook as Dave's Lemonade Stand.xlsx in your Excel2013.1/Exercises folder.
Solution:
- Open a new workbook.
- Select cell A2, type "Income", and press Enter.
- Enter the required text in cells A3:A7.
- In cells A8 and A9, type "S" and press Enter.
- Enter the required text in cells A10 and A11.
- Save the workbook in your Excel2013.1/Exercises folder.
Adding a Hyperlink
To add a hyperlink to a cell in Microsoft Excel:
- Select the cell to which you want to add the hyperlink.
- From the INSERT tab, in the Links section, select Hyperlink.
- In the Insert Hyperlink dialog box, select the text to display as well as the link address, and then click OK.
- The link now appears in the sheet
Add WordArt to a Worksheet
You can insert WordArt in a worksheet in Excel 2013.
To add WordArt:
- On the INSERT tab, in the Text section, select the WordArt arrow.
- Select a WordArt style from the list.
- A text box appears where you can enter your WordArt text.
Entering Numbers and Dates
In the next lesson we will cover formatting numbers to include commas, decimals, currency symbols and more, and formatting dates in various ways. In this lesson, however, we will simply enter dates and numbers in the most basic format, and use autofill to quickly add numbers that follow a pattern.
To enter numbers in Microsoft Excel:
- Select the cell into which you wish to enter a number by clicking on it.
- Begin typing a number.
Things to be aware of when entering numbers:
- There is no need to enter commas. If you wish to display commas, you can format your numbers to display them. This will be covered in the next lesson.
- By default, trailing zeroes are not shown. For example, if you enter "5.00" into a cell and press Enter, the value shown will change to just "5". We will cover displaying decimals in the next lesson.
To enter dates in Microsoft Excel:
- Select the cell into which you wish to enter a date by clicking on it.
- Type the date in the following format: mm/dd/yy (e.g., 12/21/12) or m/d/yy (e.g., 1/1/00).
Using the Fill Handle
If your data follows a pattern, you can use the Fill Handle to quickly and easily add data to multiple rows and columns.
To use the Fill Handle:
- Enter enough data to establish a pattern and then select the cells containing the pattern:

- Click on the Fill Handle, which is located in the bottom right cell of the selected cells:

- Drag the Fill Handle for as many rows or columns as desired:

Examples of scenarios in which it might be useful to use the Fill Handle include:
- Entering a numbered list:

- Entering days of the month:

- Entering months of the year:

- Entering yet to be named items which need to be differentiated:

- Copying formulas throughout a row or column. This will be covered later in this course.
Entering Numbers and Dates
Duration: 5 to 10 minutes.
In this exercise, you will enter the four quarters of the year at the top of your worksheet and will enter projected quarterly numbers for the two income categories.
- Open or go to Dave's Lemonade Stand.xlsx, which you created in the previous exercise.
- Follow the instructions below to add data to rows 1, 3, and 4 such that your worksheet looks like the following:

- Enter dates and numbers in columns B and C
- Use Autofill to add dates and numbers to D and E
- Edit cells A7:A9 by replacing "Some Expense" with "Payroll", "Marketing" and "Supplies", as shown in the above image.
- Save the workbook.
Solution:
- Open or go to Dave's Lemonade Stand.xlsx.
- Enter "3/31/13" in cell B1.
- Enter "6/30/13" in cell C1.
- Enter "3000" in cell B3.
- Enter "3100" in cell C3.
- Enter "2000" in cell B4.
- Enter "2200" in cell C4.
- Select cells B1:C1, click Autofill and drag to column E.
- Select cells B3:C3, click Autofill and drag to column E.
- Select cells B4:C4, click Autofill and drag to column E.
- Edit cells A7:A9 by replacing "Some Expense" with "Payroll", "Marketing" and "Supplies".
- Save the workbook.
Tidak ada komentar:
Posting Komentar