The Backstage View (The File Menu)
In this lesson, you will learn to work with the Backstage View (The File Menu).
Lesson Goals
- Open a Microsoft Excel workbook.
- Start a new Microsoft Excel workbook.
- Use Microsoft Excel templates.
- Print a Microsoft Excel workbook.
- Personalize your copy of Microsoft Excel.
Introduction to the Backstage View
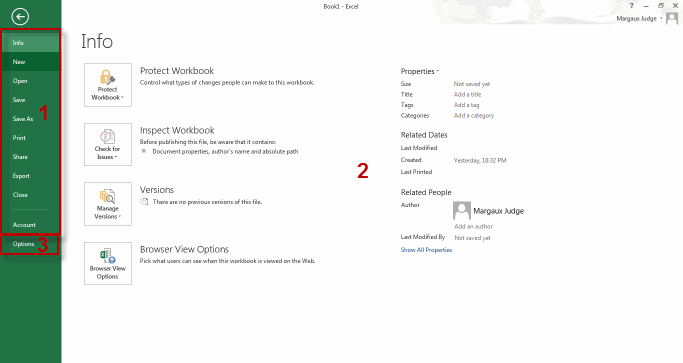
The Ribbon, covered in the prior lesson, is where you find all the commands necessary to make changes to your worksheets. Clicking on the tabs in the Ribbon changes the set of commands available to you while you work in your worksheet. After clicking on the File menu, you can no longer see your worksheet or the Ribbon. Instead, you see what Microsoft calls the Backstage view. This is where you:
- Manage your current workbook and other workbooks (Save, Open, Close, Print, etc.).
- See information about your current workbook (Permissions, Location, Size, Date Last Modified, Author, etc.).
- Manage your Excel settings and options (User Interface Options, number of sheets in new workbbooks, customize the Ribbon, etc.)
Please note that there is no FILE menu or Backstage view in Microsoft Excel 2007.
Many of the features of the Backstage view are covered in our intermediate and advanced Microsoft Excel classes. Only those that are essential to working with Microsoft Excel are covered in this class.
Opening a Workbook
There are two ways to open a Microsoft Excel workbook from the Backstage view:
- Select Open from the FILE menu.
Select a location from which to open the document in the Open section (in Excel 2013 only).
In the dialog box that opens up, navigate to the file you want to open and double-click it or select it and click Open.
2.
- For files you have recently used, select Recent from the FILE menu and then select the file.

Open a Workbook
Duration: 5 to 10 minutes.
In this exercise, you will practice opening Microsoft Excel workbooks from the File menu.
- Using the FILE menu, open My First Workbook.xlsx from the Excel2013.1/Exercises folder.
- Close My First Workbook.xlsx.
- Open My First Workbook.xlsx from the FILE menu, using a different method than you used the first time.
- Close My First Workbook.xlsx.
Solution:
- File > Open
- FILE > Open
- Navigate to Excel2013.1/Exercises.
- Select My First Workbook.xlsx and click the Open button.
- FILE > Recent
- FILE > Recent
- Click Recent Workbooks (in Excel 2013) and click the My First Workbook.xlsx workbook.
New Workbooks and Excel Templates
When creating a new Microsoft Excel workbook, you can choose between creating a blank workbook or creating your workbook from an existing template.
Creating a New Blank Workbook
To create a new blank workbook:
- From the FILE menu, select New:
- Click (double-click in Excel 2010) Blank workbook:
Creating a New Workbook from a Template
A template is a predesigned Excel workbook that you can then change to suit your needs. When you create a new workbook from a template, you are creating a copy of the original template.
To create a new workbook from a template:
- From the FILE menu, select New:
- In the Search box, search a template category and press Enter.
- Click a template, and to download it, click Create.
If you are using Excel 2010, you will follow step 1, and then double click a template category, select a template to view it, and select Download to download it.
Once you've downloaded a template, it is stored in the My Templates location on your computer.
Modifying a Template
You can modify an Excel template:
- Select the FILE menu, and select New.
- Select a template from the list and click Create.
- Make the desired changes to the template.
- Save the template with a new name. It will by default be saved in the Templates folder.
Select, Open and Save a Template Agenda
Duration: 5 to 10 minutes.
In this exercise, you will create a new workbook using a Microsoft template.
- Locate a template to use to create an agenda for a meeting.
- Download the template.
- Save the workbook as My Agenda.xlsx in your Excel2013.1/Exercises folder.
- Leave the file open as we will be using it in future exercises.
Solution:
- From the FILE menu, select New:

- In the Search box, search "agendas" and press Enter.
- Click a template, and to download it, click Create.

- Click FILE > Save As:

- Navigate to the Excel2013.1/Exercises folder.
- File name: type "My Agenda".
- Save as type: select "Excel Workbook."
- If a dialog box appears asking you if you want to save changes to the workbook template, click No.
Printing Worksheets
The Print window gives you access to several printing and page layout options. You will also see a preview of how your worksheet will print.To print a Microsoft Excel worksheet:- From the FILE menu, select Print.

- Choose your print options (number of copies, printer, etc.) and click the Print button.

Print a Worksheet
Duration: 5 to 10 minutes.In this exercise, you will print the agenda you created in the last exercise. You will need to have a printer connected to successfully complete this exercise.- Using the FILE menu, print the agenda you created in the last exercise.
Solution:
- FILE > Print
- Select your printer.
- Select any additional options you want.
- Click the Print button.
Adding Your Name to Microsoft Excel
You can personalize your copy of Microsoft Excel by adding your name. When you do so, the information is used throughout the Microsoft Office products. Excel uses this information for tracking changes and assigning comments and for prefilling data used by some of the built-in templates.To add your name and initials to Microsoft Excel:- From the FILE menu, select Options.
- The options you can customize are grouped into categories, which you can see on the left side of the screenshot below. The default category is General. Fill in your name and initials under Personalize your copy of Microsoft Office
Managing Workbook Versions
Excel automatically saves documents as you work with them. You can manage these auto-saved versions from Backstage view.To set options for managing these, click Options in Backstage view and in the Excel Options dialog box, select Save. You will see autosave options here.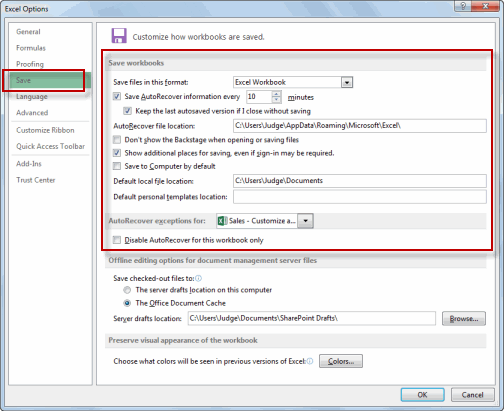 To delete autosaved workbooks:
- From the FILE menu tab, select Info, if necessary.
- Under Versions, you will see any auto saved versions.

- To delete one, right-click it and select Delete This Version.
- Click FILE > Save As:
Tidak ada komentar:
Posting Komentar